


What to expect from your first batch of compost
As soon as you are ready to harvest your first batch, don't be surprised if the compost needs some extra processing. This is perfectly normal, especially at the start when the HOTBIN may not yet have reached its optimal temperature. Later batches usually don't need as much post-processing, unless your HOTBIN has been consistently running below 40°C.
We recommend always waiting 90 - 120 days before harvesting your first batch of compost, so that the HOTBIN has enough time to get properly up to temperature. That said, there is nothing stopping you from taking a quick look behind the harvest hatch after 90 days to see how the compost looks.
Once you have harvested your first batch, you can subsequently harvest fresh compost every 30 to 90 days.
Why the base layer stays cool
As a result of rising heat, the base layer of the compost heap is always the coolest area, especially in winter, as cold air is drawn in through the base plate. The hottest and most active layers are found in the middle and top layers, where breakdown and composting occur fastest. So even if the top layer is boiling at a heat of 60°C, the bottom layer of the heap remains cool.
Usually, it is this cooler bottom layer where the compost matures and where worms and other composting microorganisms migrate to finish the compost.

What is in a base layer?
The key to successful composting is knowing the different breakdown rates of the waste you put into the HOTBIN. To give your HOTBIN a good start, we recommend adding enough easily digestible waste when you begin.
Why, you ask?
Well, this type of waste provides a quick food source for the hot-composting bacteria. As they break down the waste, they generate heat as a natural byproduct of the digestive and decomposition process.
Fresh waste = heat production
Remember this rule of thumb: without regular addition of fresh waste to the HOTBIN, no heat can be produced or maintained. As a result, some harder-to-digest materials may not fully break down within the expected timeframe.
If, on the other hand, you compost easily digestible waste types, you will find that the production of usable compost goes faster than expected.
In short: the composting speed varies greatly from user to user, as everyone composts different types of waste in different amounts. So remember; the warmer the bacteria are, the happier they are and the faster they work!

What should your first batch of compost look like?
Ok, let’s be realistic. It is unlikely that your first base layer of compost will look like the idealized compost you buy in the store. Homemade compost, whether it comes from a hot or cold composter, does not look like the compost you buy in the store.
Instead, it may fall into the range of the following five types:
1) A reasonably good batch of base layer, ready for immediate use.
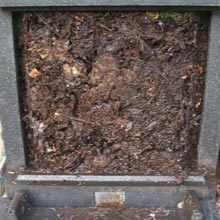
2) Blackish, compressed compost, slightly wet and sticky.
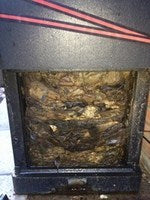
3) Mostly brown, with visible chunks remaining.
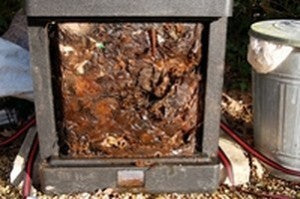
4) Brown/black, wet, sticky and possibly oozing water.
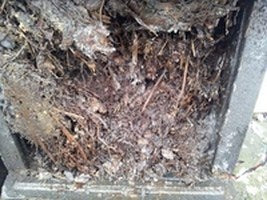
5) Pieces of your waste are still visible:
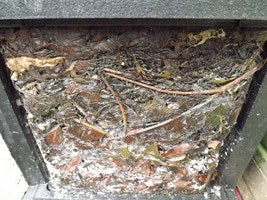
Next steps for different base layers
After about 90 - 120 days, the time has come: you open the harvest hatch to harvest the first base layer (⅓ of the heap). Depending on what your base layer looks like, we have tailored advice to help you complete the decomposition process:
- If it looks like compost and smells earthy; then harvest the compost and use it directly in the garden. Can't use the compost immediately? Then store it for later use. There are several ways to store your compost. Read how to do that here.
Your base layer of compost looks like image 2 & 5:
- Harvest the base layer. Remove all uncomposted waste and add this material back to the top of the HOTBIN;
- Mix this with about 10 liters of shredded paper or corrugated cardboard (half a carrier bag full);
- Add three large handfuls of wood chips (about 2 liters, half a kitchen bucket full);
- Add a bucket full of fresh, easily digestible waste (preferably uncooked kitchen waste and grass if available). Ensure the fresh waste is thoroughly mixed to distribute the bacteria evenly. The bacteria will first break down the easily digestible material, generating heat faster before moving on to the harder-to-digest base layer. Tip: mix everything in a large container or wheelbarrow first before putting it back into the bin to prevent heat loss.
- After you have done this, the temperature will rise to 40-60°C for a few days before stabilizing at 30°C again.
- After that, continue adding new waste as usual, along with the shredded paper and wood chips.
- Check the second base layer after 8 - 10 weeks, and the compost will be ready for use!
Your base layer of compost looks like image 3 & 4:
Lucky you! You can actually use this base layer immediately! If your base layer has a sour smell, don't be discouraged. Spread it out on a groundsheet and leave it in the sun for a day. Because the compost is re-aerated, it will lose its sour smell, dry out, and be easier to separate the large clumps from the small ones. Any incompletely broken-down parts can be added back to the top of the HOTBIN according to the instructions above.
General reprocessing tips
Sometimes you will find some items in your harvested compost batch that need a bit more time to fully break down, such as twigs, pieces of eggshell, or bone fragments. You can add these back to the HOTBIN along with fresh waste. Don't forget to add bulking agent and shredded paper or corrugated cardboard every time you add new waste. When the new material is partially composted, also add fresh waste to provide the bacteria with easily digestible food.
Don't get discouraged
Remember that your first batch of compost may not be perfect, and that is absolutely okay! Every base layer is unique, depending on the time of year and the available materials. Your base layer plays a crucial role in getting your HOTBIN off to a good start, so keep your enthusiasm up a little longer!
For more information on what to expect from subsequent compost batches, check “What does HOTBIN compost look and feel like?”
Enjoy your compost!


